What's inside
As an Amazon Associate I earn from qualifying purchases. This post may contain affiliate links at no extra cost to you.
Our Top Picks
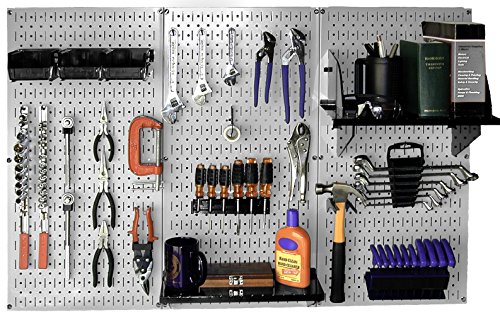 Wall Control 30-WRK-400GB Standard Workbench Metal Pegboard Tool32" x 16"16 x 0.25 x 6 Inches29 poundsCheck on Amazon

Pegboard Wall Storage Buying Guide for Beginners
For most beginners, a 1/4-inch tempered hardboard panel on 1-inch hole centers is an affordable choice for lightweight hand tools, while a 1/4-inch metal panel is a better fit for heavier tools, frequent rearranging, or a humid shop. Before buying, measure the usable wall, check the panel’s hole pattern and load guidance, and plan for spacers or a frame so the hooks have room behind the board.
Start with the wall and the tools
Measure the wall’s width and height where the panel will actually sit—not just the full wall dimensions. Account for benches, cabinets, outlets, switches, doors, and any space needed to reach tools. Locate studs before choosing panel size; mounting the panel to studs or a securely anchored frame is more dependable than relying on drywall anchors alone.
As an Amazon Associate we earn from qualifying purchases at no extra cost to you.



Next, list the tools you want to hang. A screwdriver, tape measure, and pliers need little space; a handsaw, clamps, or bulky cordless-tool cases need more. Lay the tools out on the floor in roughly the arrangement you want, leaving room to grasp handles and return tools without knocking neighboring items loose.
Worked sizing example
Suppose your clear wall area is 48 inches wide by 32 inches high. A common 24-by-48-inch panel would cover 8 square feet and fit the width, but leave 8 inches of wall height unused. Two 16-by-32-inch panels side by side would cover the same 8 square feet and fill the space more evenly. Check the actual panel dimensions and hole alignment before buying: nominal sizes can differ, and adjacent panels may not form a continuous hole grid.
As a practical planning allowance, reserve about 2 to 3 inches between tool outlines when you need room to lift items off hooks. Large tools may need more. This spacing is a layout aid, not a panel load rating.
Compare materials and hole patterns
| Panel type | Common thickness | Typical hole spacing | Good fit for | Ownership trade-off |
|---|---|---|---|---|
| Tempered hardboard | 1/8 or 1/4 inch | 1 inch on center | Light hand tools and a budget setup | Usually inexpensive; can sag, swell, or fray at holes if overloaded or exposed to moisture. |
| Metal pegboard | Often about 0.03–0.05 inch sheet metal; verify the product specification | Commonly 1 inch on center | Frequent rearranging and a tougher shop surface | More resistant to damaged holes; edges and finish can still dent, scratch, or corrode. |
| Plastic pegboard | Varies by product | Varies; check hook compatibility | Lightweight storage where easy cleaning matters | Can flex under concentrated loads; confirm the manufacturer’s limits and mounting requirements. |
These figures describe common formats, not guaranteed capacities. Capacity depends on the panel, hook, spacing, fasteners, backing, and how the load is distributed. Use the manufacturer’s published limits for the exact product, and do not assume a panel can carry a heavy tool simply because the hook fits.
Most general-purpose panels use holes 1 inch apart, but hole diameter and layout vary. Check both before buying hooks. A hook made for one system may not lock securely into another, even when the spacing appears similar. For hardboard, 1/4-inch panels generally offer a sturdier starting point than thinner panels, but proper backing and fastening matter just as much.
Choose by budget, space, and use
| Your situation | Practical choice | Why |
|---|---|---|
| Small budget; mostly screwdrivers, pliers, and measuring tools | 1/4-inch hardboard, mounted over a framed or battened air gap | Low entry cost and enough flexibility for a light hand-tool layout. |
| Limited wall area; need to rearrange tools often | Metal panel with compatible locking hooks | More resistant to hole wear and hooks shifting during repeated changes. |
| Beginner with an uneven or unfinished wall | Panel mounted to a square wood frame secured to studs | The frame creates clearance, simplifies leveling, and provides a solid mounting plane. |
| Heavy or valuable tools, such as a large plane or power tool | Use a rated panel and hardware, or store the item on a shelf or dedicated bracket | Concentrated loads can pull hooks or damage the board; a pegboard is not automatically suitable. |
Mount the panel securely
- Find the support. Use a stud finder and confirm stud locations with a small pilot hole where appropriate. Mark a level reference line. If studs do not line up with panel edges or screw locations, make a square frame from straight lumber and fasten that frame to the studs.
- Create hook clearance. Pegboard hooks need open space behind the panel to engage. Install horizontal or vertical furring strips, a perimeter frame, or manufacturer-specified spacers. The required gap depends on the hook design; follow the panel and hook instructions rather than guessing.
- Fasten through supported areas. Use screws suitable for the panel and wood backing. Place fasteners at the recommended intervals and near supported edges; avoid overtightening, which can crush hardboard or distort thin metal. Do not treat drywall anchors as a substitute for a sound frame when storing substantial weight.
- Check level and stability. Before loading tools, press gently at several points and check for movement, bowing, or loose fasteners. Correct flex or gaps now, when the board is empty.
Plan hooks around tool shape and weight
Use short single hooks for light items with a hanging hole, such as scissors or small wrenches. Double-prong hooks or purpose-made holders can help stabilize items that wobble. Wider hooks suit bulky items; bins are useful for small loose parts but should be kept within the panel’s stated capacity. For a tool without a suitable hanging point, choose a holder designed for that tool rather than balancing it on an improvised hook.
- Place frequently used tools at a comfortable reach and group them by task.
- Keep heavier tools close to frame supports or studs, and spread them across several mounting points instead of clustering them in one area.
- Leave a little extra space around tools with handles or blades that need to be lifted clear.
- Use labels or simple tool outlines only after trying the layout; a fixed outline can make later rearranging less convenient.
Load the board gradually. Hang one tool at a time, check that each hook is seated, and watch for panel flex or hooks pulling forward. If a tool shifts when you remove a neighboring item, reposition it or use a more secure holder.
What wears first—and how to avoid common problems
On hardboard, the holes and panel edges are often the first weak points: repeated hook movement can enlarge holes, while moisture can swell the material. On metal, the finish may scratch and exposed edges may corrode in damp conditions. Plastic panels can flex, especially when a heavy item hangs from one small area. Keep any panel dry, avoid point-loading, and replace damaged hooks rather than bending them back repeatedly.
Common mistakes include buying hooks before checking hole compatibility, mounting the panel flush to a wall, placing all heavy tools in one corner, and assuming a quoted capacity applies to the whole installation regardless of fasteners. A dependable setup starts with a measured layout, compatible hardware, adequate clearance, and backing attached to the wall structure.