What's inside
As an Amazon Associate I earn from qualifying purchases. This post may contain affiliate links at no extra cost to you.
Our Top Picks
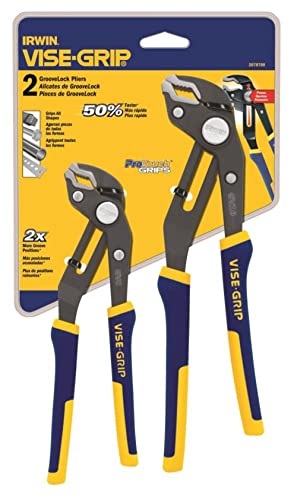 IRWIN Tools Vise-Grip GrooveLock Pliers Set2-pack (8", 10")0.75 x 7 x 11.6 inches1.4 poundsCheck on Amazon
 IRWIN Vise-Grip Original Locking Pliers with Wire CutterOne Size0.9 x 5.9 x 9.8 inches1 PoundsCheck on Amazon


Best Vice Grip Pliers for Secure Clamping and Repairs
For most repair work, the best vice grip pliers are 10-inch curved-jaw locking pliers with an adjustment screw and a lever-style release: they fit a broad range of hardware, grip rounded parts securely, and are easier to release than compact or specialty-jaw models.
That general-purpose choice is not right for every job. Jaw shape determines what the tool can hold without slipping or damaging the workpiece; adjustment range determines whether it can close around the part; and the release mechanism matters when you need to unclamp repeatedly or work in a tight space. Use the comparisons below to narrow the choice to your work.
As an Amazon Associate we earn from qualifying purchases at no extra cost to you.


Choose by the workpiece and task
- Round pipe, rod, or a damaged bolt: Choose curved jaws. Their profile concentrates contact around rounded surfaces, making them useful for gripping shapes that flat jaws may not hold securely.
- Flat stock, sheet material, or woodworking glue-ups: Choose straight jaws with broad, flatter contact surfaces. They spread pressure more evenly than curved jaws, though locking pliers should not replace purpose-made clamps where even pressure or a clean finish is essential.
- Thin sheet metal or small parts: Choose long-nose locking pliers. Their narrow tips can reach into confined areas, but they are less suited to applying heavy force or gripping large workpieces.
- Repeated clamping and release: Look for a lever-style release that you can operate deliberately. A tight release can be frustrating during repetitive work; a quick-release design can be convenient but may need more care to avoid accidental opening.
- Access behind or around an obstruction: Consider curved or long-reach jaws based on the shape and direction of access. Check the tool’s dimensions, not just its nominal length, before buying.
Compare common sizes and jaw styles
The figures below are practical buying ranges, not universal specifications. Jaw opening, throat depth, weight, and release design vary between brands and models, so check the individual manufacturer’s specifications before ordering.
| Type | Typical tool length | Typical maximum jaw opening | Best fit | Main trade-off |
|---|---|---|---|---|
| Compact curved-jaw | 5–7 in (13–18 cm) | About 1–1.25 in (25–32 mm) | Small repairs, tool bags, confined spaces | Less leverage and limited capacity |
| General-purpose curved-jaw | 10 in (25 cm) | About 1.5–2 in (38–51 mm) | Bolts, rods, pipe, mixed household and shop tasks | Can mark finished surfaces; bulky for tight access |
| Straight-jaw | 7–10 in (18–25 cm) | About 1.25–2 in (32–51 mm) | Flat-sided parts and broad gripping contact | Less naturally suited to round stock |
| Long-nose | 6–9 in (15–23 cm) | About 0.5–1 in (13–25 mm) | Small components and recessed locations | Narrow tips are not for high-force clamping |
| Large curved-jaw | 12–18 in (30–46 cm) | Often 2 in (51 mm) or more | Larger stock and jobs needing more leverage | Heavy and awkward for routine small repairs |
“Maximum jaw opening” is only one part of fit. Also check throat depth—the distance from the jaw tips to the body—and the minimum opening. A tool that opens wide enough may still fail to reach around a workpiece positioned close to a wall or edge. For delicate or visible surfaces, add protective jaw covers or use a different clamp to avoid leaving marks.
What to look for in the locking and release mechanism
Adjustment range and screw access
The rear adjustment screw sets the jaw opening and helps determine how tightly the mechanism locks. Choose a model that can be adjusted while you have a clear grip on the handles. If a part sits near the tool’s maximum capacity, the remaining adjustment may be limited; a larger tool is often more dependable than forcing a near-limit fit.
Locking pressure and control
A locking tool should hold the part firmly without requiring excessive force to close the handles. The best choice is not necessarily the one that applies the most pressure: too much force can crush soft wood, distort thin sheet metal, or damage a fastener. Adjust gradually, test the grip, and use protective pads when surface condition matters. Do not use locking pliers as a substitute for a rated clamp or lifting tool.
Release lever and clearance
Most conventional locking pliers release through a lever or tab near the handle. The exact action varies by model. Before buying, consider whether your fingers can reach the release when the tool is clamped in its intended position. For repeated bench work, comfortable, predictable release can matter more than a slightly larger opening. Keep fingers clear of the jaws and linkage when unclamping, since stored tension can make the handles snap open.
Pick the right option for your situation
| Your situation | Good starting choice | Why |
|---|---|---|
| Occasional household repairs; one tool needed | 10-inch curved-jaw pair | A versatile balance of reach, leverage, and capacity |
| Small parts or a crowded toolbox | 5–7-inch compact curved-jaw or long-nose pair | More manageable in tight spaces, with lower capacity |
| Flat workpieces or repeated bench positioning | Straight-jaw pair | Flatter contact can suit broad, level surfaces better |
| Large pipe or stock beyond a standard tool’s opening | 12-inch-or-larger model, sized to the actual workpiece | More opening and leverage, at the cost of weight and access |
| Frequent use throughout a shop | Comfortable, durable model with an accessible release | Adjustment and unclamping are repeated tasks, not minor details |
If you are choosing between two sizes, measure the largest part you expect to grip and check the manufacturer’s jaw-opening and throat-depth figures. Leave some capacity in reserve rather than buying a tool that only barely fits your biggest job.
Care, wear, and common mistakes
With regular use, the adjustment screw, pivot, teeth, and release linkage are the areas most likely to collect grime or show wear. Wipe the tool clean after use, especially after contact with oil, wood dust, or metal filings. A light coating of machine oil on the pivot and screw can help resist corrosion; wipe away excess so it does not transfer to a workpiece. Store locking pliers dry and slightly open rather than leaving them clamped under tension.
- Do not overtighten: Excessive force can damage the part and stress the tool. Adjust until the lock holds securely, then reassess.
- Do not use the jaws as a hammer: Impact can damage the teeth, pivot, or locking mechanism.
- Do not clamp finished wood directly: Teeth can leave deep marks. Use a protective pad, or choose a woodworking clamp designed to distribute pressure.
- Replace rather than rely on a slipping tool: Worn teeth, a bent linkage, or a mechanism that will not lock consistently can make clamping unpredictable.
Bottom line
For a single all-around purchase, start with 10-inch curved-jaw locking pliers and confirm that their opening and throat depth cover your largest planned workpiece. Choose straight jaws for flatter stock, long-nose jaws for access to small parts, and a larger model only when the extra capacity is useful. A good fit, manageable adjustment, and easy-to-reach release are more valuable than maximum clamping force alone.