What's inside
As an Amazon Associate I earn from qualifying purchases. This post may contain affiliate links at no extra cost to you.
Our Top Picks
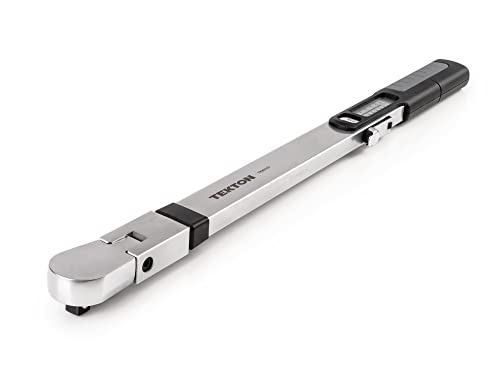 TEKTON 1/2 Inch Drive 72-Tooth Split Beam Torque1/2 Inch Drive (40-250 ft.-lb.)22.8 x 1.7 x 1.4 inches3.7 poundsCheck on Amazon


Best torque wrench for RV maintenance: the quick picks
The best torque wrench for RV maintenance is a calibrated 1/2-inch click wrench whose working range covers your vehicle’s specified wheel-nut torque; for one tool that also handles many chassis fasteners, choose a model with a lower minimum setting and a longer handle. RV torque specs vary substantially by vehicle, wheel, and hardware, so check the owner’s manual or the wheel or chassis manufacturer’s instructions before choosing a setting.
For most owners, a quality 1/2-inch click wrench is the practical starting point. A 3/4-inch drive may suit heavy-duty wheels with high torque requirements, while a 3/8-inch wrench is better for lower-torque chassis fasteners—not a substitute for a wheel wrench. The named options below are established product lines; verify the exact model’s range, accuracy specification, length, and calibration documentation before purchase, since these vary by version.
As an Amazon Associate we earn from qualifying purchases at no extra cost to you.


Shortlist by situation
- Occasional wheel service: Consider a 1/2-inch Tekton click-type torque wrench if its range spans the specified setting with room on either side. It is a straightforward choice for owners who want a mechanical tool without electronic setup.
- Frequent maintenance and more feedback: A 1/2-inch GearWrench electronic torque wrench can provide a display and audible or visual alerts, depending on the model. Check its range and battery requirements; electronics add convenience, not permission to skip a calibrated torque procedure.
- High-torque wheel hardware: Look at a 3/4-inch drive model from a professional tool line such as CDI. Confirm that its minimum setting is not so high that it excludes other intended work, and that the socket and extension system fits the wheel.
- Lower-torque chassis jobs: A separate 3/8-inch wrench, such as a suitable model from Tekton or CDI, can provide more useful resolution at lower settings. Use it only for fasteners whose specified torque falls within its range.
These are product-family suggestions, not claims that every model fits every RV. Published specifications differ across lengths, drive sizes, and revisions. Compare the manual for the exact SKU with the torque values you actually need.
What matters more than the brand
Range: avoid working at the edge
Start with the highest and lowest torque values in the jobs you plan to do. Choose a wrench whose operating range includes those values comfortably, rather than selecting by maximum capacity alone. A wheel setting near a wrench’s upper limit can leave little margin; a wrench with a high minimum may be unsuitable for smaller chassis fasteners. If your jobs span a very wide range, two appropriately sized wrenches are usually more useful than one oversized tool.
Accuracy: read the specified conditions
Many mechanical and electronic torque wrenches specify accuracy around ±4% in a portion of their range, but that figure is model-specific and may apply only when used in the stated direction and under stated conditions. For example, at a target of 150 lb-ft, ±4% represents a possible deviation of 6 lb-ft. That is not a reason to adjust the vehicle’s prescribed torque; it is a reason to buy a wrench with a clear accuracy specification and keep it in serviceable condition.
Length and access
A longer handle can reduce the effort needed for high torque, but it needs more clearance and can be awkward beside a body panel or in a storage bay. Check the tool’s overall length against the space around the wheel and the swing available for tightening. For wheel work, use a correctly sized six-point socket and a stable position. Do not add a cheater pipe: it changes leverage and can damage the wrench or lead to excess torque.
Calibration and storage
Look for a manufacturer’s calibration certificate or documented accuracy specification, plus a stated procedure for recalibration. A certificate documents the tool at a point in time; it does not mean the wrench stays accurate indefinitely. Follow the maker’s service interval and have the tool checked after a drop, suspected overload, or erratic operation. Mechanical click wrenches are commonly returned to their lowest marked setting—not below it—after use, then stored clean and dry in their case. Electronic models also need battery care and may require a prescribed shutdown or storage procedure.
Comparison at a glance
The figures below are practical size and selection guidance, not specifications for a particular SKU. Exact length, weight, range, and accuracy vary by model, so confirm them on the manufacturer’s current product page before ordering.
| Wrench type | Drive | Common working range to look for | Typical length class | Best fit | Trade-off |
|---|---|---|---|---|---|
| Compact click wrench | 3/8 in | About 10–100 lb-ft | About 14–18 in | Lower-torque chassis fasteners and accessible components | Usually not the right range or drive for RV wheel nuts |
| General-purpose click wrench | 1/2 in | About 20–150 or 30–250 lb-ft | About 18–26 in | Many light- and medium-duty RV wheel jobs, if the vehicle spec falls inside the range | One range may not cover both low chassis settings and high wheel settings well |
| High-capacity click wrench | 3/4 in | About 100–600 lb-ft | About 30–48 in | Some heavy-duty applications with high specified torque | Bulky, costly, and often unsuitable for lower-torque work |
| Electronic torque wrench | Commonly 1/2 in | Model-dependent; often overlaps general-purpose ranges | About 18–28 in | Owners who value a digital setting and alert feedback | Requires battery care; electronics do not replace calibration checks |
Those ranges are broad categories for comparing tool classes, not recommendations for any particular RV. Drive size alone does not establish capacity: check the exact tool’s rated range and ensure the required setting is within it.
Choose by your RV and how you work
| Your situation | Practical choice | Why |
|---|---|---|
| One RV, occasional tire or wheel service, limited storage | 1/2-inch click wrench sized to the manual’s wheel specification | Simple operation and less bulk than a high-capacity 3/4-inch tool |
| Routine DIY maintenance across wheel and chassis jobs | 1/2-inch wheel wrench plus a 3/8-inch wrench for lower settings | Each wrench can operate in a more suitable range for its tasks |
| Heavy-duty RV with a high wheel torque specification | High-capacity 3/4-inch wrench, after checking the wheel and chassis documentation | Provides the capacity and drive size needed for some high-torque applications |
| Infrequent use and no interest in maintaining multiple tools | Buy only after confirming the exact required torque and whether local tool hire is practical | A suitable calibrated wrench is essential; ownership is not always the least-cost route |
Wheel torque: use the vehicle’s procedure
There is no universal RV wheel-nut torque. The correct value can depend on the chassis, wheel material and design, stud and nut type, and whether the hardware is original or aftermarket. The vehicle manual or wheel manufacturer’s instructions take precedence over a generic chart. If the wheel or hardware has been changed, confirm the specification with its manufacturer or a qualified service professional.
- Confirm the specification and units. Check the exact torque value, whether it is listed in lb-ft or N·m, and any instructions about thread condition or tightening sequence. Do not assume lubricated and dry threads use the same torque.
- Inspect and seat the wheel. Follow the vehicle’s lifting and safety instructions. Start nuts by hand and use the specified tightening pattern so the wheel seats evenly. Do not use an impact wrench for final torque.
- Set the wrench carefully. Select the specified value, lock the adjustment if the tool has a lock, and use a steady pull at the handle’s grip area. Stop at the click or electronic alert; repeated pulls can keep tightening the fastener.
- Follow any recheck schedule. Some manufacturers require wheel-nut rechecks after a specified distance or service event. Use the schedule and procedure for your vehicle, not a guessed interval.
Use a stable, properly rated jack and support equipment when removing a wheel; never work under a vehicle supported only by a jack. If you are unsure about lifting points, wheel hardware, or the required torque, have a qualified RV technician do the work.
Ownership: what wears and what causes trouble
For click wrenches, the adjustment mechanism and ratchet head are vulnerable to rough handling, contamination, and overload. Keep the tool in its case, wipe it down after use, and avoid using it as a breaker bar. A torque wrench is a measuring tool, not a substitute for a long-handled loosening tool. Electronic models add batteries and circuitry; protect them from water and impact and replace batteries as instructed.
Extensions and adapters can affect the applied torque depending on their arrangement. A straight extension generally does not change effective handle length in the same way an offset crowfoot can. If an adapter changes the distance from the wrench’s drive to the fastener, follow the wrench manufacturer’s calculation guidance—or avoid the adapter when possible. Keep sockets fully seated and matched to the fastener.
Bottom line
For many RV owners, a well-specified 1/2-inch click wrench is the best torque wrench for RV wheel maintenance, provided its range covers the manufacturer’s wheel setting. Add a 3/8-inch wrench for lower-torque chassis work if you do those jobs regularly. Choose a 3/4-inch model only when the vehicle’s documented requirements justify its capacity. In every case, the vehicle and wheel hardware—not a general-purpose recommendation—determine the correct torque.