What's inside
- Best Bike Torque Wrenches for Accurate Bicycle Maintenance
- Shortlist by riding and repair situation
- What to compare before buying
- Comparison: common bicycle torque-wrench types
- Make the choice by your actual use
- How to use a bike torque wrench without damaging parts
- Ownership costs and common mistakes
- Bottom line
- Related Guides
As an Amazon Associate I earn from qualifying purchases. This post may contain affiliate links at no extra cost to you.
Our Top Picks
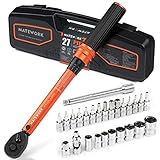
 LEXIVON Bike Torque Wrench 1/4-Inch Dr. 15-Piece Kit1/4"DR. 1.48-19.18 FT-LB Kit4.69 x 10.35 x 2.28 inches1.3 poundsCheck on Amazon


Best Bike Torque Wrenches for Accurate Bicycle Maintenance
For most home bicycle maintenance, the best bike torque wrench is a 1/4-inch-drive, 2–14 Nm preset wrench with a readable scale and a compatible set of hex and Torx bits; choose a smaller-range 1–6 Nm tool instead if you mainly work on carbon components or delicate controls.
Bicycle fasteners span a wide range: a small control clamp may call for only a few newton-metres, while some crank or pedal-related fittings need substantially more. A single wrench rarely covers every job equally well. The useful choice depends on the torque range you actually need, the wrench’s low-end resolution, and whether its head and bits can reach the fastener in your frame.
As an Amazon Associate we earn from qualifying purchases at no extra cost to you.


Shortlist by riding and repair situation
- Most home mechanics: A 2–14 Nm 1/4-inch click wrench offers practical coverage for stems, seat clamps, brake and shift controls, and many accessory fasteners. Check the component maker’s specification before use.
- Carbon-focused work: A 1–6 Nm wrench provides finer control at the low end. It is a better match for light clamps and small fasteners than a broad-range wrench whose minimum setting is already close to the required torque.
- Frequent workshop use: Consider a reputable beam or click wrench with a calibration certificate or a clearly stated accuracy specification, plus replaceable or standard 1/4-inch bits. Verify that its range covers your most common jobs.
- One tool for higher-torque jobs: If a component’s stated requirement exceeds a small bicycle wrench’s maximum, use a suitable higher-range wrench rather than tightening beyond the tool’s rated range.
What to compare before buying
Low range matters more than a big maximum
Many bicycle fasteners are tightened in the low single-digit Nm range. A wrench that starts at 2 Nm is not automatically suitable for a 1 Nm specification, even if its maximum is much higher. Look for a minimum setting below the lowest torque you intend to apply, and check whether the scale has useful increments there. Do not assume a tool is accurate throughout its range just because it displays a number.
1/4-inch drive and bit access
A 1/4-inch drive is a common, convenient format for bicycle-sized sockets and bits. It can simplify replacement when a supplied bit wears or does not fit a particular fastener. But drive compatibility is only part of the fit: a bulky ratchet head or long bit holder may not clear a seat cluster, stem, or recessed bolt. For tight frames, a compact head and short bits can matter more than a broad accessory bundle.
Hex and Torx coverage
Check the included sizes rather than relying on a listing that simply says “bike bits.” Common bicycle fasteners use metric hex keys, while some rotors and other components use Torx. The exact sizes vary by component. A useful kit should identify each bit size clearly and fit the fastener snugly; a loose or partly engaged bit can damage the head before the torque wrench clicks.
Calibration and adjustment
Compare the manufacturer’s stated accuracy and whether calibration documentation is supplied. Accuracy claims may be expressed as a percentage, but their value depends on the range and test conditions. A scale that is easy to read, locks securely, and adjusts smoothly helps prevent setting errors. With a click wrench, return the setting to its recommended storage position after use; do not leave it wound to a high setting.
Comparison: common bicycle torque-wrench types
| Tool type | Typical range | Drive / bits | Best fit | Main limitation |
|---|---|---|---|---|
| Compact preset bicycle wrench | 2–14 Nm | Often 1/4-inch; commonly supplied with hex and Torx bits | Routine home adjustments across many cockpit and seat fasteners | May not reach below 2 Nm or cover higher-torque tasks |
| Low-range bicycle wrench | 1–6 Nm | Usually 1/4-inch or a bit-holder interface | Low-torque fittings and carbon-component work | Not a substitute for a higher-range tool |
| Beam-style wrench | Varies; often selected for low-to-mid torque | Drive and included bits vary | Users who want a visible reading and simple mechanism | Needs a clear viewing angle and steady technique |
| Higher-range 1/4-inch click wrench | Often around 5–25 Nm | 1/4-inch drive; bits may be separate | Fasteners requiring more torque than compact low-range tools cover | Less suited to very low settings; confirm its minimum range |
These are representative range categories, not guarantees for every model. Confirm the exact specification, drive size, included bits, and accuracy statement for the particular wrench before buying.
Make the choice by your actual use
| Your situation | Practical choice | Why |
|---|---|---|
| Occasional tune-ups, modest budget | 2–14 Nm preset kit with 1/4-inch compatibility | Combines useful coverage with a straightforward setup; check bit sizes and calibration information. |
| New mechanic working mostly on cockpit bolts | Preset wrench with a clear, fixed setting | Reduces scale-reading and adjustment mistakes, though the range must match the component specification. |
| Carbon bars, seatpost, or small clamps | 1–6 Nm low-range wrench | Places common delicate-fastener settings farther from the tool’s lower limit. |
| Frequent repairs and several bikes | Adjustable, documented wrench; add a second range if needed | Better coverage and serviceability can justify the extra cost and storage space. |
How to use a bike torque wrench without damaging parts
- Find the correct specification. Read the marking on the component or consult its manufacturer’s instructions. If the fastener has a range, stay within it; do not substitute a generic value.
- Check the fastener and bit. Use the exact hex or Torx size, seat it fully, and inspect for dirt, corrosion, or a damaged head. Follow the component maker’s instructions on lubrication, because friction changes clamping force.
- Set the wrench carefully. Unlock the adjustment if required, dial in the target value, and lock it. On a beam tool, keep the scale visible and read it straight on.
- Approach the fastener in a controlled way. Keep the tool aligned with the bolt and apply smooth force. Stop at the click or specified reading; repeated clicks can continue tightening the fastener.
- Work evenly when several bolts clamp one part. Tighten in small alternating steps where the component maker recommends it, then finish at the specified value. This helps avoid uneven clamping.
- Store and maintain it correctly. Release a click wrench to its recommended storage setting, keep it dry and clean, and avoid dropping it. If accuracy is critical, the tool has been overloaded, or it gives inconsistent readings, arrange calibration or service.
Ownership costs and common mistakes
In general market terms, basic preset bicycle kits tend to cost less than adjustable tools with documented calibration, while professional-grade wrenches can cost considerably more. A modestly priced wrench is poor value if its bits are soft, its setting is hard to read, or its range misses the jobs you bought it for. Bits are the likely wear item: replace a rounded or damaged bit rather than forcing it into a fastener.
The most common avoidable problems are using a wrench below its rated minimum, choosing the wrong bit, pulling at an angle, and treating the torque value as universal. A torque wrench controls applied torque; it does not confirm that a component is installed correctly or that its threads are in good condition.
Bottom line
For most riders, start with a compact 2–14 Nm 1/4-inch wrench and verify that its included hex and Torx bits match your bike. Choose a 1–6 Nm model when low-torque work dominates, and add a higher-range tool only when your components call for it. The best bike torque wrench is the one whose usable range, accuracy information, and physical access match the fasteners you actually maintain.