What's inside
As an Amazon Associate I earn from qualifying purchases. This post may contain affiliate links at no extra cost to you.
Repairing a chipped chisel is mostly a metal-removal problem. The right sharpening stone depends on how much steel must come off, how deep the chip is, and whether you are buying one stone or building a complete setup. A fine stone cannot efficiently remove a large chip, while an overly coarse stone can leave deep scratches and make it easy to grind away more steel than necessary.
Our Top Picks
 KFMK 10 Inch Variable Speed Wet Sharpening System10 inch10 x 10 x 10 Inches34.4 PoundsCheck on Amazon
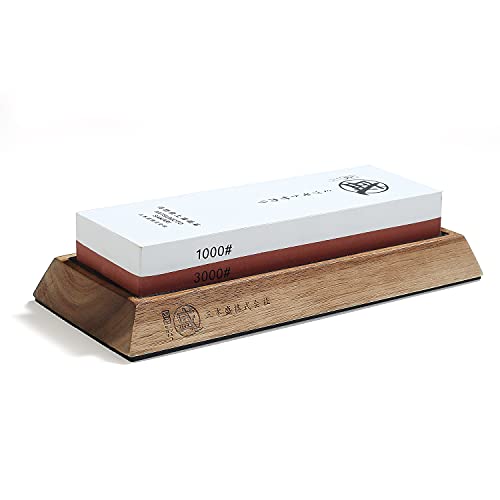 MITSUMOTO SAKARI 1000/3000 Grit Japanese Whetstone Knife Sharpening1000/3000 Grit8.27 x 3.54 x 0.82 inches1.7 PoundsCheck on Amazon

Start with the size of the chip
Inspect the cutting edge under good light. A tiny nick that disappears after a few strokes of a coarse stone needs a different approach from a 1/16-inch chunk missing from the corner. Measure roughly across the opening, not just its depth.
| Chip condition | Best starting grit | Typical next step |
|---|---|---|
| Small nicks, less than about 0.010 inch | 800–1,000 grit | 1,000–4,000 grit, then polish if desired |
| Visible chip up to about 1/32 inch | 400–600 grit | 1,000–4,000 grit |
| Large chip, 1/32 to 1/16 inch | 220–320 grit | 600–1,000 grit, then finishing stone |
| Severe damage or badly rounded edge | 80–220 grit, preferably a grinder | 400–1,000 grit and normal honing sequence |
These ranges are starting points, not strict rules. Stone grading varies between abrasive types and manufacturers. A 400-grit diamond plate may cut faster than a 400-grit waterstone, and a hard ceramic stone may feel different again.
Which grit should you buy?
For most chipped chisels, a 400- to 600-grit stone is the most useful repair grit. It removes steel quickly enough without being as aggressive as a very coarse stone. If the chip is small, a 1,000-grit stone may be sufficient. If the edge is visibly broken across a large section, start coarser.
A practical two-stone setup is a coarse repair stone around 400 grit and a medium or fine stone around 1,000 to 3,000 grit. If you want a sharper, cleaner edge for paring work, add a 5,000- to 8,000-grit finishing stone. That last step improves polish and can make the chisel feel smoother in soft wood, but it does not repair a chip or compensate for a poor bevel.
If you are buying only one stone, choose a combination stone with approximately 400/1,000 or 1,000/3,000 sides. A 400/1,000-grit combination waterstone is a sensible budget choice for general repair and sharpening. The trade-off is that combination stones have less surface area on each side and can wear unevenly if you always sharpen in the same spot.
Match the abrasive to the job
Waterstones cut quickly and are pleasant to use, but most must be soaked or splashed with water and flattened regularly. Soft stones can dish noticeably while removing a chip. That is not a defect by itself, but a hollow stone will gradually round the chisel bevel and make consistent sharpening harder.
Diamond plates are fast, flat, and ready immediately. They are particularly useful for repairing a damaged edge or flattening the back of a chisel. A 400-grit diamond sharpening plate is often the simplest repair tool. Inexpensive diamond plates can lose cutting ability or develop uneven spots, so they may not be the best long-term choice for heavy daily use.
Ceramic stones need little preparation and stay flat longer than many waterstones. They often cut more slowly during major repairs but work well for maintenance. Oilstones are durable and controlled, though they are usually slower and messier to clean. Do not put oil on a waterstone; the liquid is part of the stone’s intended operation, not interchangeable lubrication.
Use the coarse stone only until the chip is gone
Set the chisel bevel flat against the stone at its existing angle, commonly 25 degrees for a general bench chisel. If the edge has a secondary micro-bevel, ignore it during the initial repair and work the primary bevel until it reaches the damaged edge.
Use firm, controlled strokes over the full width of the stone. Keep the chisel moving so you do not create a hollow track. Check the edge every 10 to 20 strokes. The coarse stage is finished when the cutting edge is straight and the chip has disappeared across its full width. Looking only at one corner can leave a small crescent of damage behind.
For a large chip, grinding the bevel may take several minutes. A bench grinder or slow-speed water-cooled grinder can remove the bulk faster, but overheating is a serious failure mode. If the steel turns blue, the temper may be damaged. Dip the chisel frequently, use light pressure, and stop before the edge becomes hot. A slow-speed wet sharpening grinder costs more than a stone but makes repeated major repairs easier.
Refine the edge and flatten the back
After the chip is removed, move to 800–1,000 grit. Use lighter pressure and remove the deep scratches left by the repair grit. Then progress to 3,000 or 4,000 grit if the chisel is used for general bench work. Stop at 1,000 grit if the tool is for rough carpentry; the edge will be functional, and additional polishing will not last long in dirty or knotty wood.
Do not neglect the back. Place the first 1 to 2 inches of the chisel’s back flat on the coarse stone and polish until the damaged area is clean and flat. You do not need to flatten the entire back of a thick chisel. On the finer stone, remove the coarse scratches near the edge. A hollow or scratched back prevents the cutting edge from meeting the work cleanly.
Avoid the common buying and sharpening mistakes
Buying an ultra-fine 8,000-grit stone first is a common mistake. It feels premium, but it cannot efficiently remove a chip. Buying only a 220-grit stone creates the opposite problem: the edge is repaired quickly but left with scratches that take excessive time to remove.
For occasional home repairs, a 1,000/3,000-grit combination sharpening stone is adequate when chips are small. If the chisel has suffered a substantial break, add a coarse 400-grit stone or use a grinder first. Spend money on a flattening plate or reliable honing guide before buying an extremely fine finishing stone. A flat abrasive and a consistent angle affect the result more than a high grit number.