What's inside
As an Amazon Associate I earn from qualifying purchases. This post may contain affiliate links at no extra cost to you.
Furniture repairs look far better when the plug follows the surrounding grain instead of appearing as a round, cross-grain spot. A good wood plug cutter set makes that possible, but only if the cutter produces a clean-sided plug, the plug fits the hole closely, and you install it with the grain aligned. For most repairs, a set of tapered or slightly oversized cutters in several diameters is more useful than a large kit filled with rarely used sizes.
As an Amazon Associate we earn from qualifying purchases at no extra cost to you.


Our Top Picks
 Make it Snappy Tools 3 Piece Tapered Plug1/4" + 3/8" + 1/2"6.3 x 5.55 x 0.85 inches0 poundsCheck on Amazon

What to Look for in a Plug Cutter Set
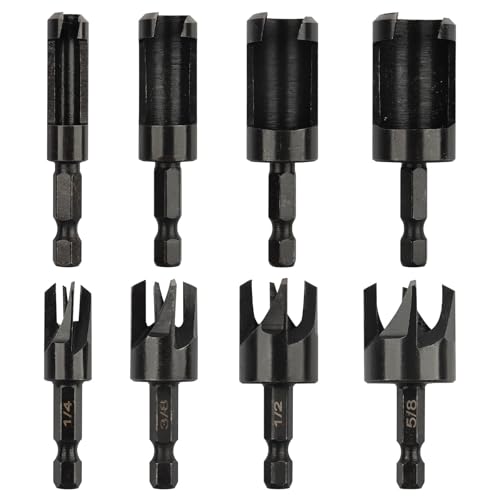
For matching grain direction, choose cutters that make solid plugs, not dowel-like pieces with a hole through the center. Solid plug cutters are intended to be cut from scrap taken from the same board or from a hidden area of the furniture. The best sets typically include 1/4-inch, 3/8-inch, 1/2-inch, and 5/8-inch cutters. Those sizes cover most screw holes, damaged mortises, and small veneer or edge repairs.
Cutting depth matters. A plug cutter that makes a 3/8-inch-deep plug is adequate for filling a shallow countersink, but a 1/2-inch or deeper cutter gives you more material to trim flush. Avoid driving the cutter so deep that it bottoms out or burns in the stock. A plug should be slightly longer than the hole depth, usually by about 1/16 inch, so it can be pared or sanded flush.
Look for cutters with a hex shank or a clean round shank that matches your drill press or chuck. A plug cutter is not a Forstner bit: it cuts an annular groove around the plug and can grab if used aggressively. A drill press offers much better control, particularly with cutters larger than 1/2 inch.
The Best Set Type for Furniture Repairs
| Set type | Best use | Advantages | Drawbacks |
|---|---|---|---|
| Basic four-piece solid plug set | Occasional screw-hole repairs | Low cost, useful sizes, easy to store | May lack larger diameters and depth control |
| Six- to eight-piece solid plug set | Regular furniture and cabinet work | More size choices, better coverage for damaged areas | Quality varies; extra sizes may see little use |
| Tapered plug cutter set | Visible repairs where a tight fit matters | Wedges into the hole and hides small diameter errors | Harder to remove if driven too deeply |
| Flush-cut or specialty cutter set | Thin stock and delicate surfaces | Can reduce breakout and simplify trimming | Usually more expensive and less versatile |
For most owners, a solid wood plug cutter set with four or six sizes is the sensible starting point. The cheaper option is fine if you are repairing painted furniture, filling a shelf-pin hole, or covering a screw head in an area that will be stained dark. Premium cutters become worthwhile when you need repeatable plugs in expensive hardwoods.
How to Match the Grain Direction
Make the plug from the same board whenever possible. A plug cut from unrelated oak may have a different color, pore pattern, or figure even if the species is identical. On a visible panel, save an offcut before starting the repair. If no offcut exists, take material from the underside, inside edge, or another concealed section rather than buying a random dowel.
Mark the grain direction on the face of the scrap with a pencil arrow. Drill the plug with the cutter moving in the same direction as the board’s face grain. Then mark that same direction on the plug before removing it. When you insert the plug, align the arrow with the surrounding grain. This is especially important in quarter-sawn oak, ash, and figured woods, where the mismatch is obvious after finish is applied.
Do not use a plug cut from the end grain if the repair is on a face-grain panel. End grain absorbs stain differently and usually looks like a dark dot. Likewise, avoid turning a plug sideways merely because it fits better. Grain direction is part of the repair, not a cosmetic detail to handle afterward.
Cutting Clean, Usable Plugs
Clamp the scrap securely to a sacrificial board. Set the drill press to roughly 500 to 900 rpm for a 1/2-inch cutter in hardwood; use the lower end for larger cutters and dense species. Feed steadily, lifting the cutter every few seconds to clear chips. Constant pressure traps dust in the groove and creates heat, which can scorch both the plug and the surrounding fibers.
Stop before the cutter reaches the sacrificial board. Cut to the desired depth, then separate the plug with a thin chisel or a handsaw. If the cutter wanders, leaves torn fibers, or produces a plug with a tapered side, sharpen or replace it. A dull cutter often creates a plug that is technically usable but leaves a visible dark glue line around its edge.
For a screw-hole repair, drill the damaged area with a brad-point bit or Forstner bit that is slightly smaller than the plug’s widest diameter. A 1/2-inch plug generally needs a clean 1/2-inch hole, but measure the actual plug first. Cut a test plug and test hole in scrap. A fit that requires hammering can split thin stock; a fit with more than about 1/32 inch of visible clearance will require excessive adhesive and may show as a ring.
Installing and Trimming the Plug
Brush glue onto the hole walls and the plug sides, but do not flood the hole. Excess glue can prevent the plug from seating and may cause a light-colored halo under clear finish. Align the grain marks, press the plug in, and use a padded block to tap it until it stops. With tapered plugs, leave about 1/16 inch proud of the surface. With straight plugs, leave 1/16 to 1/8 inch proud so you have room to trim.
After the adhesive cures, trim the plug with a sharp chisel held nearly flat. A flush-cut saw can work, but protect the surrounding finish with thin cardboard and use a saw without an aggressive set. Sanding alone is a poor method for a proud plug: it can dish the surrounding wood before the plug is flush.
What I Would Buy
For occasional repairs, buy a four-piece wood plug cutter set covering 1/4 to 5/8 inch, then spend the savings on a sharp brad-point bit and a small chisel. For regular cabinet or furniture work, choose a tapered wood plug cutter set with clearly stated cutting diameters and replaceable or sharpenable cutters.
A broad kit is not automatically better. If the cutters are poorly ground, the extra sizes only multiply frustrating results. Prioritize clean cutting edges, accurate diameter markings, and a case that prevents the teeth from contacting one another. The right cutter, matching scrap, and careful grain alignment matter more than owning a dozen sizes.