What's inside
As an Amazon Associate I earn from qualifying purchases. This post may contain affiliate links at no extra cost to you.
For most tight concave curves, a 120-grit spindle-sander sleeve is the best starting point. It removes material fast enough to shape an edge without making the deep scratches that 60- or 80-grit sleeves leave. Keep 80 grit for correcting a rough cut or changing a curve substantially, and use 150 or 180 grit to refine the surface after the shape is right.
As an Amazon Associate we earn from qualifying purchases at no extra cost to you.


Our Top Picks
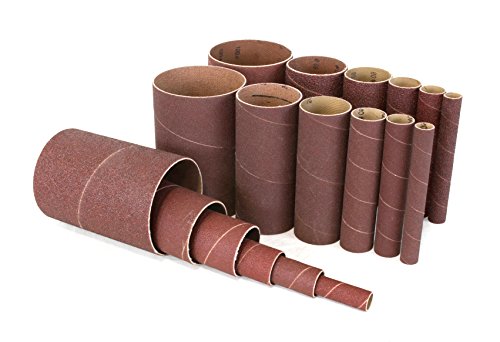 WEN 6510SPC Assorted Grits Spindle Sanding Sleeves18 Count9.42 x 0.06 x 4.5 inches0.7 poundsCheck on Amazon
 POWERTEC 11240 4.5 Inch Sanding Sleeves for Spindle4.5 Inch9 x 4.7 x 3.5 inches0.6 poundsCheck on Amazon
 POWERTEC 11215 4.5 Inch Sanding Sleeves for Spindle3" (Pack of 3)4.7 x 5.4 x 3.2 inches0.2 PoundsCheck on Amazon


Choose grit by how much wood you need to remove
Grit is a trade-off between removal speed and scratch depth. Coarse sleeves cut quickly, but they can flatten small sections of a curve, leave visible grooves, or round over an edge before you notice. Fine sleeves are easier to control for light cleanup but can burnish the surface or take a long time if the curve still needs shaping.
A practical sequence is 80 grit for significant correction, 120 grit for shaping and routine sanding, then 150 or 180 grit for a final pass. Skip a grit only when the previous sleeve leaves no scratches that would remain visible under your finish. For example, moving from 80 straight to 180 can work on a small, forgiving piece, but often leaves coarse scratches that take too long to remove.
| Sleeve grit | Best use | Main risk |
|---|---|---|
| 60–80 | Removing saw marks, correcting a curve, or taking down a proud spot | Deep scratches, rapid material loss, and uneven curves |
| 100–120 | General shaping and most routine curve work | Can still leave marks if you press hard or linger |
| 150–180 | Refining a finished shape and preparing for many common finishes | Slow for stock removal; can clog on resinous wood |
| 220 and finer | Light finish sanding or between-coat work when appropriate | Not a substitute for removing deeper scratches first |
Match the sleeve to the curve, not just the grit
The drum diameter matters as much as the abrasive. A small drum reaches a tighter inside radius, while a larger drum supports a broader curve and is less likely to create a narrow hollow. The curve should be no tighter than the drum can follow without forcing the workpiece against it. If the radius is too small, use a smaller drum or finish the tightest area with a file or hand-sanding block.
Use a sleeve that fits the drum securely and is intended for your sander’s size. A loose sleeve can slip or wear unevenly; the wrong length can leave abrasive unsupported or interfere with the table opening. If you need replacements, compare a mixed-grit spindle-sander sleeve assortment with single-grit packs. Assortments are useful when you are still learning which grits your projects consume, but a pack of one frequently used grit usually costs less per sleeve.
How to sand a curve without changing its shape
Mark the edge with a pencil before sanding. Run the workpiece against the sleeve with light, steady pressure, moving along the curve rather than holding one spot against the drum. Let the abrasive cut; pushing harder can slow the motor, increase heat, and make the sleeve wear faster. Keep the work moving, especially near the ends of a curve, where a pause can create a divot.
Check the profile often with a template or by comparing it to the mating part. A spindle sander removes material quickly, and a smooth-looking edge is not necessarily a consistent radius. If a spot is low, stop: sanding the rest of the curve to match it may ruin the part. Return to a coarser grit only if the shape needs correction, then step back through finer grits to remove the new scratches.
Use the table insert that best supports the work around the drum, and keep the work flat. An unsupported gap can let a narrow piece dip and catch. Wear eye protection and connect dust collection where possible; fine wood dust is easy to inhale, and some species cause irritation. Switch off and wait for the drum to stop before changing sleeves.
Adjust for wood and the next finish
Softwoods and end grain can show scratches readily, while figured hardwood may tear out if you use a dull sleeve or aggressive pressure. On resinous wood, inspect the abrasive for loading. A clogged sleeve rubs rather than cuts, which creates heat and can leave a shiny, compressed patch. Clean or replace it instead of leaning harder.
For paint or an opaque finish, 120 grit may be enough for shaping before primer, depending on the finish system. For clear finishes, remove coarse scratches before applying stain or clear coat; stain can make them more obvious. Follow the finish maker’s sanding guidance rather than automatically taking every project to 220 grit. Extra-fine sanding may add time without improving the result, and overly polished wood can affect how some stains take.
What to buy
If you sand curves occasionally, a modest assortment covering roughly 80, 120, and 180 grit is a sensible first purchase. It lets you correct, shape, and refine without stocking every grade. A spindle-sander sleeve set in common grits is a practical option, provided the drum diameters and sleeve lengths match your machine.
If you do repeat work, buy more 120 grit and keep a few 80- and 180-grit sleeves for specific jobs. There is little benefit in paying extra for a large assortment of very fine sleeves if the sander is used mainly to establish a shape. Choose a 120-grit replacement sleeve pack when that is the grade you reach for most. The cheaper sleeve is fine for occasional use if it fits properly, cuts evenly, and does not shed or clog prematurely; for frequent work, consistent fit and wear are worth comparing alongside price.