What's inside
As an Amazon Associate I earn from qualifying purchases. This post may contain affiliate links at no extra cost to you.
For hardwood screw holes, a countersink has two jobs: create a clean recess for the screw head and avoid tearing the surrounding fibers. Single-flute and double-flute designs can both do that, but they behave differently in a drill, especially in dense woods such as maple, oak, beech, and walnut.
The short version is simple: a single-flute countersink is usually easier to control and less likely to chatter in a handheld drill. A double-flute countersink cuts faster and often leaves a more even recess when the tool is sharp and properly aligned. For occasional furniture repairs, the cheaper single-flute option is often sufficient. For repeated work or visible joinery, a good double-flute bit is usually worth the extra cost.
As an Amazon Associate we earn from qualifying purchases at no extra cost to you.


Our Top Picks
 DEWALT Countersink Drill Bit Set for Wood1/4, 3/8, 1/2, 5/8, 3/4 Inch5.2 x 4.6 x 1 inchesCheck on Amazon


How the Flutes Change the Cut
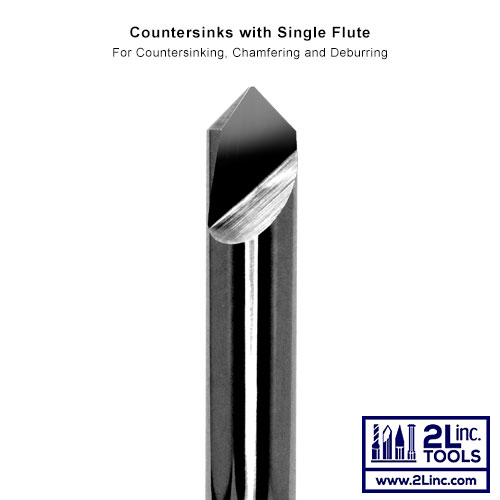
A single-flute countersink has one cutting edge sweeping around the cone. It removes material aggressively at one point, much like a single-tooth router bit. That makes the tool relatively easy to manufacture and inexpensive. It also gives chips a generous path out of the hole.
A double-flute countersink has two cutting edges spaced around the cone. Each edge removes less material per rotation, so the cut is more balanced. In a drill press, that generally produces a smoother, more concentric recess. In a handheld drill, however, both edges need to enter the wood evenly. If the tool is tilted or the pilot hole is off-center, a double-flute design can chatter rather than quietly correcting itself.
Flute count is not the only factor. Sharpness, cutting angle, body stiffness, pilot diameter, and the quality of the drill chuck matter just as much. A cheap, dull double-flute bit can perform worse than a sharp single-flute bit.
Single-Flute Countersinks: Strengths and Weaknesses
The main advantage of a single flute is forgiving entry. Because only one edge is cutting, the bit tends to take a small initial bite instead of trying to engage the entire rim at once. This is useful when working freehand or when the screw hole is near an edge.
Single-flute tools also clear dust well. Hardwood dust can pack into a shallow countersink, raising friction and causing burn marks. The open design helps prevent that, particularly when drilling slowly without dust extraction.
The trade-off is vibration. A single cutting edge applies force unevenly during each rotation. If you press too hard, run the drill at excessive speed, or use a large countersink, the tool can leave small scallops around the recess. The bit may also pull itself sideways if the pilot hole is loose.
For a small number of holes in oak or maple, a single-flute countersink bit is a sensible budget choice. It is especially practical when the screw head will be covered with a plug, filler, or painted finish.
Double-Flute Countersinks: Strengths and Weaknesses
Two flutes share the cutting load and tend to produce a more symmetrical cone. That matters when the countersink remains visible, such as on a cabinet hinge, a hardwood tabletop, or a clear-finished piece of furniture.
Double-flute designs are also better suited to repeated production work. With a firm pilot drill and consistent pressure, they can cut dozens or hundreds of holes with less visible variation. A drill press makes their balance advantage more obvious, but a good handheld drill works well if you keep it square to the surface.
They are less tolerant of poor technique. If one flute is slightly dull, clogged, or misaligned, the other flute can make the bit wobble. A loose chuck magnifies the problem. Double-flute bits can also cost more, and inexpensive versions sometimes have uneven cutting edges that defeat the reason for choosing two flutes.
Choose a double-flute hardwood countersink when you need repeatable, clean recesses or are working with expensive stock where tear-out is difficult to hide.
Head-to-Head Comparison
| Characteristic | Single flute | Double flute |
|---|---|---|
| Handheld control | Generally forgiving | Needs better alignment |
| Surface finish | Good when sharp; may leave light scallops | Usually smoother and more concentric |
| Chip clearance | Very good | Good, but can clog sooner |
| Production speed | Fine for occasional work | Better for repeated holes |
| Cost | Usually lower | Usually higher |
| Best match | Repairs, covered holes, general DIY | Visible joinery, batches, drill-press work |
Setup for Clean Hardwood Holes
Use a countersink with the correct included angle for the screw. Many wood screws use an 82-degree head, while some metric and hardware screws use 90 degrees. A mismatch leaves contact on a narrow ring instead of under the whole head. The screw may sit proud, split the recess, or strip while being driven.
Drill the pilot hole first, unless the countersink has a properly sized integrated pilot. For a typical #8 wood screw, a pilot around 1/8 inch in softwood may work, but dense hardwood often needs about 9/64 inch to 5/32 inch depending on the screw’s core diameter and the required grip. Test on scrap. The pilot should let the threaded portion cut cleanly without forcing the screw to act as its own drill.
Countersink only deep enough for the screw head to finish flush or slightly below the surface. Going 1/16 inch too deep can leave a thin bottom that breaks through, particularly near an edge. Set a depth stop for batch work, or mark the desired depth with tape for a small project.
Run the drill at moderate speed with light pressure. A 1-inch countersink commonly behaves well around 500 to 1,000 rpm in hardwood; smaller countersinks can run faster, but heat is still the enemy. If the wood darkens, the bit is dull, the speed is too high, or you are holding the tool in the cut too long. Back the bit out occasionally to clear dust rather than forcing it.
Avoiding Tear-Out and Splitting
Clamp the work securely and keep the drill perpendicular to the face. Countersinking across end grain, near a board edge, or over a void in figured wood increases the chance of breakout. Stay at least twice the screw diameter from an edge when the design allows it; for a 1/4-inch screw, that means roughly 1/2 inch or more.
For the cleanest visible holes, drill the pilot and countersink from the finished face, then drive the screw at low speed. Stop as soon as the head reaches the surface. An impact driver can bury a screw suddenly and crush the countersink, so use a drill driver with its clutch set low for final seating.
Which One Should You Buy?
Buy a single-flute countersink if you are making fewer than a few dozen holes, using a handheld drill, or hiding the holes with plugs or filler. It gives the best value and is less demanding to use.
Buy a double-flute countersink if the recess will be visible, you are working on premium hardwood, or you need consistent results across a cabinet or furniture project. Look for a rigid body, cleanly ground cutting edges, and a pilot matched to your screws rather than choosing by flute count alone.
For mixed projects, a countersink bit set with interchangeable pilots is often more useful than one premium bit. It lets you match the screw diameter and angle, which has more effect on the finished joint than the difference between one and two flutes.