What's inside
As an Amazon Associate I earn from qualifying purchases. This post may contain affiliate links at no extra cost to you.
Stainless steel is a poor match for a weak automatic center punch. Its tough, work-hardening surface can spring back from a light strike, leaving a shallow dimple that lets the drill wander. For layout work, the best punch is not necessarily the one with the heaviest spring. You want controlled impact, a sharp replaceable point, a comfortable barrel, and enough adjustment to make a visible mark without creating a crater.
For most shop and fabrication work, a medium- to heavy-duty adjustable automatic punch is the best choice. A basic fixed-force punch is fine for thin sheet and occasional holes, but stainless rewards a tool that lets you increase impact gradually.
As an Amazon Associate we earn from qualifying purchases at no extra cost to you.


Our Top Picks
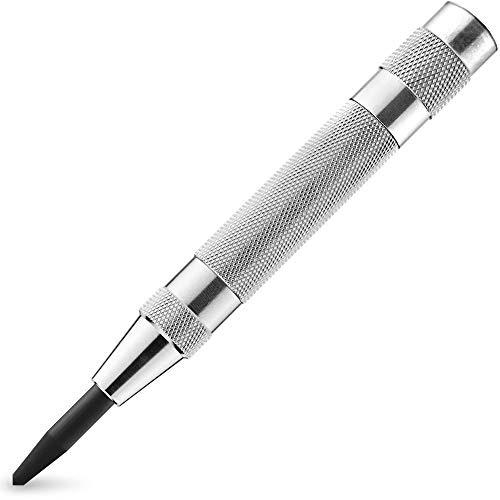 NEIKO 02639A 6-Inch Automatic Center Hole Punch with6" Length6 x 6 x 6 inches0.3 PoundsCheck on Amazon


What to Look For in a Stainless Steel Layout Punch
Adjustable impact force is the most useful feature. Stainless varies widely: 26-gauge sheet needs a lighter mark than 1/4-inch plate, and a polished 304 surface may require more force than mild steel. An adjustable punch lets you start low and increase pressure until the dimple is large enough for the drill point.
A replaceable or serviceable tip matters because the tip is the wear item. Look for hardened tool steel and a point that can be replaced or sharpened. A rounded or chipped tip makes an oversized, off-center mark. It also takes more spring force to produce the same result.
A knurled, non-slip barrel helps you keep the punch vertical. Many layout errors blamed on the tool are actually caused by the barrel slipping or leaning as the cap is pressed. A tool around 5 to 6 inches long is easy to control, while a very short pocket punch can be awkward on larger panels.
A positive trigger action is preferable to a mushy mechanism. The release should be predictable, with a clear click or snap. Avoid punches that fire as soon as you set them down or that require excessive pressure to cock; both problems make accurate layout harder.
The Main Choices Compared
| Type | Best use | Strengths | Limitations |
|---|---|---|---|
| Adjustable automatic punch | General stainless layout | Variable force, one-hand operation, reusable tip on better tools | Costs more; mechanism can wear or jam |
| Fixed-force automatic punch | Light sheet and occasional work | Simple, inexpensive, consistent | May be too weak for thick stainless or too aggressive for thin sheet |
| Spring-loaded prick punch | Fine layout marks and delicate surfaces | Small point, good control, inexpensive | Requires a hammer; not as quick for repeated marks |
| Hammer-driven center punch | Heavy plate and fabrication | Highest possible impact and durable construction | Slower, noisier, and easier to overstrike or damage thin material |
Best Overall: Adjustable Automatic Center Punch
An adjustable automatic punch is the sensible default for stainless layout work. It gives you enough force for common 304 and 316 stainless while still allowing a shallow starting mark. Search for an adjustable automatic center punch with a replaceable tip rather than choosing solely by the lowest price.
Use the lowest setting first. Place the point on the intersection of your layout lines, hold the barrel perpendicular, and press straight down. If the mark is barely visible, increase the setting one step and fire again in the same dimple. This is safer than starting at maximum force, particularly on thin stainless sheet where a deep punch can distort the back side.
For a 1/8-inch hole in 16-gauge stainless, a dimple around 1/32 inch deep is generally enough to keep a standard twist drill centered. You do not need a deep, bowl-shaped depression. Excessive force can raise a burr around the mark and leave a witness mark that remains after finishing.
When a Cheaper Fixed Punch Is Fine
A fixed-force automatic punch is a good buy for occasional work on 20-gauge stainless, small brackets, appliance panels, and other thin material. It is also useful as a shop backup. The cheaper option is fine when all your holes are similar in size and material, and you do not need to tune the impact.
Its limitation appears when the punch is either too light or too aggressive. A weak fixed punch may leave a mark that the drill point cannot hold. A hard fixed punch can dent thin sheet, especially if the material is supported poorly. If you choose this style, a medium-force tool is more versatile than a tiny marking punch, but it will not replace an adjustable model for mixed jobs.
For Thick or Work-Hardening Stainless
For stainless plate over roughly 1/4 inch, or for repeated production layout, a hammer-driven punch can be more reliable than an inexpensive automatic mechanism. A solid punch and light hammer tap provide a direct, repeatable impact. This setup is also easier to clean and repair.
The trade-off is control. A hammer punch can easily make a mark deeper than necessary, and the punch may skate if the first tap is too hard. Use a small machinist’s hammer, keep the punch vertical, and start with a light tap. For a hand-held solution, choose a heavy-duty automatic center punch with a substantial barrel and adjustable spring.
How to Get Accurate Marks
Clean the stainless before marking. Oil, abrasive dust, or a protective film can make the tip slide. Scribe the layout lines with a sharp carbide scriber or a fine permanent marker, then place the punch exactly at the intersection. On a brushed or reflective finish, a small piece of masking tape can make the lines easier to see, but do not let the tape cover the actual point.
Support thin sheet on a flat surface. A gap beneath the work allows the metal to flex, reducing the punch’s effect and possibly leaving a raised ring. For finished panels, use a scrap of plywood or a sacrificial plastic sheet if the back surface must be protected.
After punching, inspect the point. If the dimple is off-center, do not try to correct it by punching repeatedly from one side; that creates an elongated hole. Re-mark the correct location nearby if possible, or use a small pilot drill held carefully in the proper position. For larger holes, drill a pilot hole first, use cutting fluid intended for stainless, and keep the drill speed low enough to prevent work-hardening.
Maintenance and Failure Modes
Wipe the punch clean after use and keep abrasive stainless chips out of the spring mechanism. If the tool begins firing inconsistently, inspect the tip and clean the barrel before adding lubricant. Too much oil attracts grit. Replace a mushroomed or visibly chipped tip rather than grinding it freehand; an uneven point will not locate a drill accurately.
For a broader set of punch sizes, a center punch set with replaceable tips is worthwhile. For one reliable layout tool, however, buy the adjustable single punch first. It offers the best balance of force, control, and cost for stainless steel.