What's inside
As an Amazon Associate I earn from qualifying purchases. This post may contain affiliate links at no extra cost to you.
Cabinet installation is a light-duty carpentry job, but the wrong hammer can still damage a cabinet, bruise a face frame, or make small adjustments harder than they need to be. A rip claw hammer and a finish hammer are both capable of driving nails, yet they are designed for different kinds of work.
For most cabinet installation, a finish hammer is the better everyday choice. A rip claw hammer becomes useful when you need to remove stubborn nails, split a small piece of wood, or apply more force during framing-style work. The cheaper option is fine if you only install a few cabinets and already own it, but the differences matter when you are working close to finished surfaces.
As an Amazon Associate we earn from qualifying purchases at no extra cost to you.


Our Top Picks

What the Claws Are Designed to Do
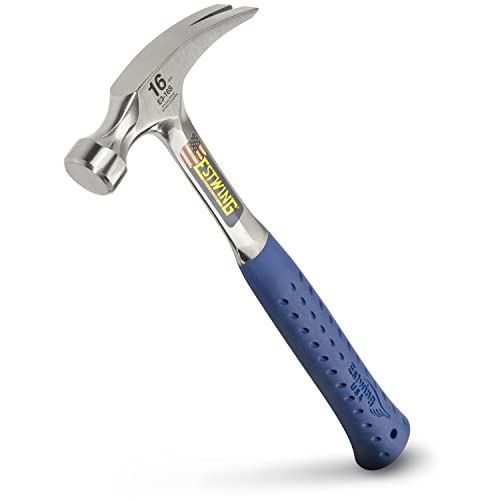
A rip claw hammer has claws that are nearly straight with the hammer’s handle. That geometry gives the claws more leverage for pulling nails and makes them useful for prying and, in some cases, splitting wood along the grain. It is common on framing hammers and general-purpose claw hammers.
A finish hammer has more curved claws. The curve gives you a compact nail-pulling tool and helps the hammer remain balanced for controlled strikes. Finish hammers are usually lighter, often in the 10- to 16-ounce range, with a smooth face intended to reduce damage when driving small finish nails or brads.
The distinction is not absolute. A rip claw can drive a small nail, and a finish hammer can pull one. The issue is control. Cabinet work puts the tool close to laminate, paint, veneer, and prefinished panels, where a slip or overstrike can create a visible defect.
Comparison at a Glance
| Feature | Rip claw hammer | Finish hammer |
|---|---|---|
| Typical head weight | 16 to 22 ounces | 10 to 16 ounces |
| Claw shape | Relatively straight | More curved |
| Main strength | Leverage, prying, pulling embedded nails | Controlled fastening and light trim work |
| Risk near finished surfaces | Higher; more force and a larger head | Lower, though technique still matters |
| Best cabinet use | Removing old work or handling blocking | Shimming, trim, cleats, and light fastening |
Why a Finish Hammer Usually Wins
Cabinet installation rewards accuracy more than striking power. You may need to tap a shim into place, set a small nail in a cleat, adjust a scribe strip, or drive a nail without denting a face frame. A 12- or 14-ounce finish hammer produces enough force for these tasks while being easier to stop and redirect.
The lighter head also reduces fatigue during a long installation. That matters when you are repeatedly working overhead or holding a cabinet in position with one hand. A 20-ounce rip claw can drive a nail faster, but it is easier to overdrive a nail or miss the intended contact point.
Choose a smooth-face finish hammer if you are buying one hammer specifically for cabinet work. Look for a comfortable handle, a securely attached head, and a face that is smooth rather than aggressively milled. A milled or checkered face grips nail heads well, but it can leave a circular mark on a cabinet frame if you miss.
Where a Rip Claw Makes Sense
A rip claw is the better tool for removing existing cabinets, pulling long nails, and dismantling rough framing around the installation area. Its straighter claws can get farther under a nail head, and the leverage is useful when a nail is driven flush or buried under paint.
It is also useful for installing or modifying wood blocking. For example, if a wall cleat is held with large nails or you need to pry away a warped strip, a rip claw will do the job with fewer strokes. The same tool can split a short scrap or open a joint, although a pry bar is safer when the material is substantial.
For a general-purpose hammer that will also handle demolition and blocking, compare 16-ounce smooth-face rip claw hammers. A 16-ounce version is a reasonable compromise; heavier 20- to 22-ounce models are more tiring and offer little benefit for ordinary cabinet fastening.
Damage Risks and How to Avoid Them
The most common hammer-related cabinet damage is not a broken cabinet. It is a small dent, a chipped edge, or a nail driven through a thin side panel. Cabinet sides are often 1/2 inch thick, and a nail that seems harmless can emerge through the other face if it is too long or driven at the wrong angle.
Use screws for joining cabinet boxes and securing cabinets to wall studs whenever possible. A hammer is mainly for shims, temporary positioning, small trim nails, and certain cleats. Do not use the hammer to force a cabinet into alignment; loosen the screws, correct the position, and retighten.
When tapping a finished part, put a scrap block between the hammer and the cabinet. The block spreads the impact and prevents the hammer face from touching the veneer. For small nails, start the nail with light strikes and finish with a nail set rather than trying to bury the head with the hammer face.
Keep the claws away from exposed cabinet surfaces. If you must pull a nail near finished material, slide a thin wood block under the claw. This distributes the load and reduces the crescent-shaped dent that a claw can leave while levering upward.
Weight, Handle, and Face Details
For installation, head weight matters more than brand. A 12- to 16-ounce hammer is usually enough. If you also do framing or demolition, a 16-ounce rip claw is more versatile. Avoid selecting a 22-ounce framing hammer simply because it feels powerful; cabinet work rarely needs that much impact.
A straight-grain hickory handle offers traditional shock absorption and is replaceable if damaged. Fiberglass and composite handles resist weather and abuse, but their feel varies. Hold the hammer before buying if possible. A handle that is too thick or slippery will reduce control, especially when making short overhead taps.
A magnetic nail starter can be convenient for one-handed work, but it is not essential. More important is a smooth, flat face with no sharp rim. Check that the head has no movement on the handle and that the claws are not bent or excessively thin.
Which One Should You Buy?
Buy a finish hammer if cabinet installation, trim, shelving, and light household repairs are your main jobs. It gives better control and is less likely to damage finished work. A basic 12- or 14-ounce hammer is sufficient; you do not need a premium model to install a kitchen.
Buy a rip claw hammer if you regularly remove cabinets, work with wall blocking, or want one hammer that can handle rougher repairs. A smooth-face 16-ounce model is the most practical middle ground. If you already own a rip claw, there is no urgent reason to replace it for one installation—use a scrap block, keep your strikes light, and use screws where appropriate.
For frequent cabinet and trim work, adding a 12-ounce smooth-face finish hammer is a modest upgrade that improves control. For demolition or nail removal, a flat pry bar and nail puller will usually protect cabinets better than using either hammer’s claws.