What's inside
As an Amazon Associate I earn from qualifying purchases. This post may contain affiliate links at no extra cost to you.
Thick maple is one of the hardest jobs for a table saw blade. The wood is dense, the cut puts a long load on the teeth, and a slow feed can leave brown scorch marks that are difficult to sand out. The best blade is usually not the blade with the highest tooth count. For ripping maple stock 1-1/2 inches or thicker, look for a sharp, full-kerf ripping blade with carbide teeth, large gullets, and roughly 20 to 30 teeth.
As an Amazon Associate we earn from qualifying purchases at no extra cost to you.



Our Top Picks
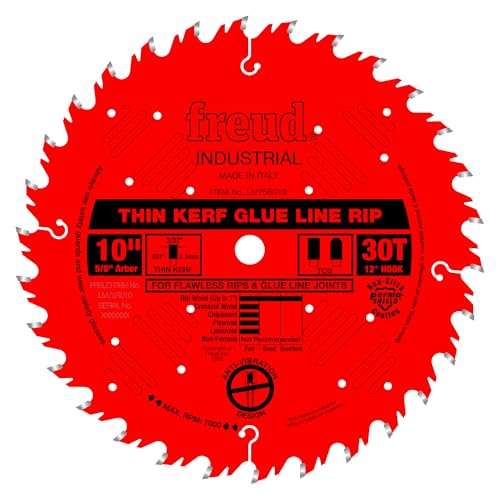 Freud LM75R010: 10" Industrial Thin Kerf Glue LinePack of 110 x 10 x 0 inches1 poundsCheck on Amazon
 DEWALT 10 in. 24 Tooth General Purpose Saw10" / 24 Teeth13.4 x 11.5 x 0.5 inches0.8 poundsCheck on Amazon


The best blade type for thick maple
A dedicated ripping blade is the safest choice when the primary job is cutting with the grain. Its low tooth count clears chips quickly, while the larger gullets reduce the chance of packed sawdust heating the blade. A 24-tooth blade is a strong starting point for a contractor or cabinet saw. A 30-tooth blade can leave a slightly cleaner edge while still removing waste effectively.
Choose a 10-inch 24-tooth ripping blade for the most demanding cuts. If you frequently switch between ripping and crosscutting, a 30-tooth general-purpose blade is more convenient, but it may require a slower feed in thick maple.
Full-kerf blades remove about 1/8 inch of material and are generally stiffer than thin-kerf blades. That stiffness helps keep the cut straight and prevents the blade from deflecting when the workpiece presses against it. Thin-kerf blades remove less wood and are useful on lower-powered saws, but they can flex more easily in dense stock. Use thin kerf when motor capacity is the limiting factor, not simply because it wastes less wood.
| Blade type | Best use in maple | Main advantage | Main drawback |
|---|---|---|---|
| 20–24 tooth ripping blade | Thick maple and repeated ripping | Fast chip clearance and lower heat | Rougher edge and more tear-out |
| 30–40 tooth combination blade | Mixed ripping and crosscutting | Good compromise for one-blade users | Slower feed and greater burning risk in thick stock |
| 60–80 tooth crosscut blade | Trim cuts and joinery | Clean crosscut edges | Too many teeth for efficient thick ripping |
| Thin-kerf ripping blade | Small saws with limited power | Lower cutting resistance | More likely to deflect or wander |
Tooth design matters more than the package label
For ripping, flat-top grind teeth are efficient because they remove wood across the full width of the kerf. Some ripping blades use an alternate-top-bevel pattern or a modified grind to improve edge quality. Either can work, but large gullets and a low tooth count are more important than a small difference in tooth geometry.
Look for carbide tips wide enough to be sharpened several times. A premium blade with thick carbide often stays accurate longer and can be professionally sharpened, while an inexpensive blade may become disposable after hitting a hidden staple or screw. A blade with a lower hook angle, around 10 degrees or less, is also easier to control than an aggressive positive-hook blade. Avoid using a blade intended for hand-held circular saws if its hook angle is unusually aggressive.
For a smoother edge from a ripping blade, use a scoring or clean-up pass rather than moving to an 80-tooth blade. A high-tooth-count blade can cut maple cleanly, but in 2-inch material it creates more tooth engagement, produces smaller gullets, and gives heat fewer ways to escape.
How to prevent burning during the cut
Blade choice cannot correct a slow or unstable setup. Confirm that the blade is clean, sharp, and installed with the teeth facing forward at the top of the blade. Resin and maple dust on the sides of the carbide can increase friction. Clean the blade with a non-caustic blade cleaner; do not scrape carbide with steel tools.
Check the rip fence against the miter slot before cutting. The rear of the fence should be parallel to the blade or very slightly farther away—about 0.002 to 0.005 inch—so the work does not pinch between the fence and the blade. Also check that the splitter or riving knife is aligned with the blade. A misaligned fence or riving knife can cause burning even with a new blade.
Feed at a steady rate. Stopping over the blade is a common cause of scorch marks. For thick maple, the right rate depends on the saw and the width of the cut, but a continuous feed is more important than a specific speed. If the saw bogs noticeably, reduce the feed only briefly or make a shallower first pass. Do not force the work so hard that the motor stalls or the blade deflects.
Keep the stock flat and supported through the entire cut. Long, heavy boards can rotate into the blade after passing the fence, creating a hot spot. Use an outfeed table, roller support, or a helper positioned safely away from the blade. Never let a helper pull the workpiece from behind while the blade is cutting.
Which blade should you buy?
For a cabinet saw or a strong 3-horsepower contractor saw, buy a 10-inch full-kerf carbide ripping blade with 20 to 30 teeth. This is the best choice when thick maple is a regular part of your work.
For a 1-1/2 to 2-horsepower saw, a 10-inch thin-kerf ripping blade may be the better match. It reduces the load on the motor, but use a riving knife designed for the blade’s kerf and watch for deflection. If you mostly make furniture parts and need one blade for both operations, a 10-inch 40-tooth combination blade is a reasonable cheaper option.
The cheaper combination blade is fine for occasional maple ripping when the boards are narrow, the saw is adequately powered, and you are willing to feed steadily. It is not the best choice for daily production, wide glue-up stock, or repeated cuts through thick hard maple. In those cases, the dedicated 24-tooth blade will usually cut faster, run cooler, and reduce the time spent sanding burn marks.
When the blade is the problem
Replace or sharpen the blade if burning occurs despite a parallel fence, aligned riving knife, clean blade, and steady feed. Other warning signs include a cut that wanders, a pitch that rises sharply during the cut, chipped carbide, and smoke from a moderate feed rate. A blade that has been sharpened several times may have reduced tooth height and no longer clear chips properly.
Before blaming the blade, make a test cut in a straight, dry piece of maple. If only one section burns, inspect the stock for internal tension or bowing. If the entire cut burns, address the blade, alignment, or feed rate first. That diagnostic step often saves money: many “bad blade” problems are actually fence pinching or a board that is not staying flat.