What's inside
As an Amazon Associate I earn from qualifying purchases. This post may contain affiliate links at no extra cost to you.
Our Top Picks
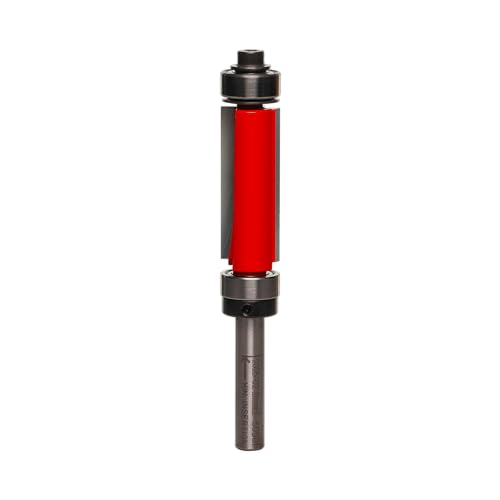 Freud 1/2" Top & Bottom Bearing Flush TrimOne Size4.95 x 1.65 x 1.65 Inches0.17 poundsCheck on Amazon


Flush-Trim Bit vs. Pattern Bit for Copying a Hardwood Template
For copying a hardwood template, a flush-trim bit and a pattern bit can produce the same final shape, but they are set up for opposite template positions. The practical difference is where the bearing sits in relation to the cutters.
A flush-trim bit normally has its bearing at the tip, below the cutting edges when used in a handheld router. The template sits on top of the workpiece, and the bearing rides against its edge. A pattern bit has the bearing above the cutters, so it is useful when the template is mounted on top of the workpiece or when the router is used on a table.
As an Amazon Associate we earn from qualifying purchases at no extra cost to you.



The names are not perfectly standardized. Some manufacturers call an up-bearing bit a template bit or pattern bit, while others use “pattern bit” for almost any bearing-guided copying cutter. Check the bearing location and the cutting length rather than relying on the label.
Quick comparison
| Feature | Flush-trim bit | Pattern bit |
|---|---|---|
| Bearing position | Usually below the cutters | Usually above the cutters |
| Typical setup | Template on top, router held above the work | Template on top for a handheld router, or below the work on a router table |
| Best use | Flush trimming an oversized blank to a mounted template | Copying a template with more cutter length or using a router table |
| Main limitation | Limited reach below the bearing | Can be awkward to use when the template is underneath a handheld workpiece |
| Typical diameter | 1/2 to 1/2 inch common; smaller sizes also available | 1/2 inch common, with longer versions for thick stock |
When a flush-trim bit is the better choice
Choose a flush-trim bit when the hardwood template is fixed to the top of a larger blank. This is the familiar setup for making multiple identical parts: attach the template with screws through waste areas, double-sided tape, or clamps, then let the bearing follow the template while the cutters remove the excess wood.
For example, if the template is 3/4 inch thick and the blank is 1-1/4 inches thick, a bit with at least 1/2 inch of cutting length may be enough, provided the bearing can contact the template throughout the cut. Leave no more than about 1/8 to 1/4 inch of stock for the bit to remove in a pass. Removing a full 1/2 inch of hardwood beside a template creates unnecessary heat, vibration, and tear-out risk.
A short flush-trim bit is often easier to control. A 1/2-inch-diameter bit with a 3/4-inch cutting length is a sensible general-purpose size. For thin parts, a 1/4-inch bit reduces the load, but the smaller diameter has a lower maximum safe speed and is easier to deflect if pushed aggressively. Follow the cutter manufacturer’s RPM limit.
Flush-trim bits are also convenient for cleaning an edge after rough-cutting with a bandsaw or jigsaw. Keep the rough cut within roughly 1/8 inch of the template. If the saw cut is wavy or leaves 3/8 inch of material, the router must work harder and is more likely to climb or burn.
If this is your normal setup, a top-bearing flush-trim router bit is the straightforward purchase. Verify that “top bearing” refers to the bearing position in your actual handheld setup; product descriptions are inconsistent.
When a pattern bit makes more sense
A pattern bit is valuable when you need the cutters to reach farther than a standard flush-trim bit allows. Longer pattern bits can cut a thicker blank in one setup, or they can be used with a template positioned above the workpiece while the bearing remains accessible.
On a handheld router, an up-bearing pattern bit works well with the template fastened to the top of the blank. The bearing runs against the template, and the longer cutting edge reaches down into the work. On a router table, the same general arrangement can be reversed: the template may be underneath the work, with the bearing riding against it from below.
This extra reach is useful, but it is not automatically better. A long cutter has more leverage, and any looseness in the collet, router base, template, or workholding becomes visible as chatter or a tapered edge. A 1-inch cutting length is more demanding than a 1/2-inch cutter. Use the shortest bit that covers the material, and make multiple passes when possible.
For template routing on a table, look at up-bearing pattern router bits. If the template must stay below the work, confirm that the bit’s bearing is actually below the cutting edge when installed in your router table.
Setup for clean hardwood copies
Make the template accurately first. Any bump, flat spot, or sanding error transfers directly to every copy. Hardwood templates should have clean, smooth edges because a rough edge can damage the bearing or cause it to bounce. Seal porous template edges with a thin coat of finish or cyanoacrylate, then sand them smooth after curing.
Secure the template and blank so they cannot shift. Screws placed in waste areas are the most dependable method. Heavy-duty double-sided tape works for smaller parts, but press the surfaces together firmly and keep dust away from the adhesive. Do not rely on hand pressure or a clamp that interferes with the router base.
Rough-cut the blank before routing, leaving approximately 1/8 inch of material. Feed against the cutter’s rotation: with a normal handheld router, this usually means moving left to right along an outside edge when the bit is on the near side of the work. A conventional cut gives the router a tendency to pull into the work gradually. Avoid climb-cutting unless you have a specific reason and complete control.
Take shallow passes when the stock is thick. If the bearing loses contact with the template, stop immediately; the cutter will copy the wrong shape. Listen for a change in pitch, watch for smoke, and inspect for burn marks. Hardwood burns when the bit is dull, the feed is too slow, the pass is too deep, or the RPM is too high for the diameter.
Common mistakes and buying advice
The most common mistake is buying the correct cutter length but the wrong bearing position. Draw the intended setup on a scrap board before ordering. Also check the shank size: a 1/2-inch shank is preferable for larger cutters if your router accepts it, because it generally resists deflection better than a 1/4-inch shank.
A 1/2-inch-shank flush-trim bit set is economical if you copy parts in several thicknesses, but a set is unnecessary for occasional work. Buy one sharp bit with the required bearing position and cutting length instead.
Replace or resharpen a bit that leaves a fuzzy edge, requires excessive force, or burns clean hardwood despite a reasonable feed rate. A cheap bit is fine for a few softwood copies or a one-off jig. For repeated hardwood production, a carbide bit with a sealed bearing and replaceable bearing option costs more initially but usually gives cleaner, more consistent results.
Which bit should you buy?
Buy a flush-trim bit when your template will sit on top of the blank and you are trimming a near-finished outline. Buy a pattern bit when you need longer cutting depth, a different template position, or router-table compatibility. If both setups are possible, choose the shorter, larger-diameter bit that reaches the material safely. It will normally be easier to control, cooler-running, and less prone to deflection than an unnecessarily long cutter.