What's inside
- Top Picks at a Glance
- Quick Comparison Table
- 1. Bosch GLL50-20G: Best Overall for Cabinet Layout
- 2. DEWALT DW088CG: Best Premium for Frequent Use
- 3. Klein 93MCLPG: Best Compact Pro Option
- 4. Huepar Green Cross Line Laser: Best Value
- 5. Fanttik D2 Pocket: Best Pocket Size
- 6. CIGMAN Green Cross Line Laser: Best Budget With Extras
- Also Consider
- How We Chose
- Buying Guide
- Step-by-Step Layout for a Run of Upper Cabinets
- Common Mistakes to Avoid
- Frequently Asked Questions
- Which One Should You Buy?
- Sources
As an Amazon Associate I earn from qualifying purchases. This post may contain affiliate links at no extra cost to you.
The best green cross line laser level for hanging cabinets is the Bosch GLL50-20G if you want a dependable, compact brand-name tool, and the Huepar 100-foot green cross line model if you want a lower-cost level that still projects the horizontal and vertical lines a cabinet install needs. The Klein 93MCLPG is the runner-up for people who want a compact, self-leveling design with a plumb spot and a clearly stated laser class. All three throw a green beam, which most people see much more clearly than red in a lit kitchen.
Hanging wall cabinets is one of the few home jobs where a few millimetres of error becomes obvious. A row of upper cabinets that droops one inch over eight feet looks wrong against a level countertop, and doors will not line up. A cross line laser projects a level horizontal line and a plumb vertical line at the same time, so you can mark the cabinet bottom line, find stud positions against the layout, and keep every box on the same plane without a long spirit level and a helper to hold it.
This guide compares six real, currently sold green cross line lasers, explains the layout method that makes them useful, and shows how to check any laser’s accuracy before you drill. It is a different angle from a head-to-head of two models: here you get a short list, a workflow, and a decision guide for kitchens, garages and laundry rooms.
As an Amazon Associate we earn from qualifying purchases at no extra cost to you.


Our Top Picks


Top Picks at a Glance
- Best Overall: Bosch GLL50-20G. Green-beam self-leveling cross line from a major tool brand.
- Best Value: Huepar 100 ft green cross line laser. Self-leveling with a stated 100-foot range and a stated indoor use for picture hanging and tile.
- Best Budget: CIGMAN green cross line laser. 100-foot, four brightness levels, magnetic bracket.
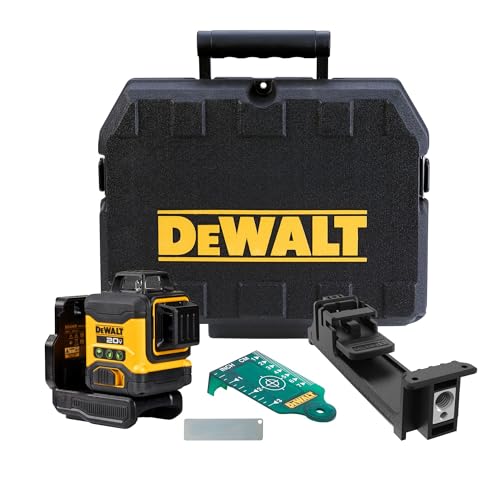
- Best Premium: DEWALT DW088CG. A professional-brand green cross line level.
- Best Compact Pro Option: Klein 93MCLPG. 75-foot, Class 2, plumb spot.
- Best Pocket Size: Fanttik D2 Pocket. USB-C rechargeable, built for picture hanging and home DIY.
Quick Comparison Table
| Product | Best for | Key specs (per listing) | Watch for | Price tier |
|---|---|---|---|---|
| Bosch GLL50-20G | Reliable all-round cabinet layout | 50 ft, green beam, self-leveling, cross line | Shorter stated range than the 100 ft models | Mid-range |
| DEWALT DW088CG | Frequent jobsite use | Green cross line, high-visibility lines | Range and accuracy not listed in the title | Premium |
| Klein 93MCLPG | Compact carry and clear safety rating | 75 ft, Class 2, under 1 mW, green cross line with plumb | Battery type not listed in the title | Premium |
| Huepar green cross line | Budget-friendly kitchen installs | 100 ft, self-leveling, indoor use for picture hanging and tile | Accuracy not listed | Budget |
| Fanttik D2 Pocket | Small jobs, tight spaces | 100 ft, self-leveling, Type-C rechargeable | Pocket size means smaller base and fewer mounting options | Budget |
| CIGMAN green cross line | Bright rooms, pulse mode | 100 ft, 4 brightness levels, magnetic bracket, IP54, pulse mode | Accuracy not listed in the title | Budget |
1. Bosch GLL50-20G: Best Overall for Cabinet Layout
- Self-leveling cross-line laser with a green beam
- 50-foot stated range
- Listing mentions an ingress-protection rating, but the text is cut off, so the number is not listed here
- Compact housing; weight and battery type not listed
Best for: kitchen and laundry-room cabinet installs where you need a clean horizontal reference and a plumb line. Skip if: you often work in a very large open space where a longer rated range matters.
For hanging upper cabinets, the stated 50-foot range is more than enough. A kitchen wall is rarely longer than 15 or 20 feet, and the most useful distance is the short one between the tool and the wall. What matters more is the stability of the housing and how quickly the pendulum settles. A tool that settles quickly lets you move the laser between walls without waiting. Bosch does not publish a settling time in the listing, so look for the maker’s own number if it matters to you.
The green beam is the main reason to pick this class of tool for a cabinet job. A red line can disappear against light-coloured walls under strong kitchen lights, whereas green is easier for the eye to see. Even so, bright sunlight from a window can wash out any line, so close the blinds or work with the room dimmed while you mark. The listing does not say whether a detector or pulse mode is supported, so treat that as not listed.
Pros: major tool brand; green beam; self-leveling; compact. Cons: 50 ft stated range; some specs cut off in the listing; mid-range price.
2. DEWALT DW088CG: Best Premium for Frequent Use
- Cross line laser level with a green beam
- High-visibility alignment lines, per the listing
- Range, accuracy and battery type: not listed in the title
- Professional-grade brand positioning
Best for: remodelers and installers who hang cabinets regularly and want a tool that feels built for the job. Skip if: you will hang one kitchen and put the tool in a drawer.
The premium tier here buys you a brand with wide service support and likely replacement accessories. For a one-time home install, a cheaper laser can do the same marking job. If you plan to take the laser from kitchen to kitchen, the extra ruggedness could pay off. The listing does not give measurements for the case, mounting threads or battery system, so confirm those on the maker’s page: a threaded mount that fits a tripod or a magnetic base saves a lot of time when you need the laser at the exact cabinet height.
One practical point for cabinet work is the mounting method. A laser sitting on a countertop or a stack of boxes can shift. A magnetic bracket or a wall clamp lets you place the line at the required height, which is typically measured from the floor. Bring a tripod or a stack of rigid boxes if your model does not include a mount.
Pros: trusted jobsite brand; green high-visibility lines; suited to repeat work. Cons: premium tier; key specs not listed in the title; overkill for a single project.
3. Klein 93MCLPG: Best Compact Pro Option
- Compact self-leveling laser level
- 75-foot stated range
- Class 2 laser, under 1 mW, per the listing
- Bright green cross line with plumb spot
Best for: installers who want a small tool for the toolbox with a clearly stated laser class. Skip if: you need a tripod-ready kit with extra accessories.
The Class 2, under 1 mW label is useful because it tells you what safety category the laser belongs to. Class 2 lasers are considered low power, but you should still avoid pointing them at anyone’s eyes and follow the maker’s instructions. The plumb spot is handy for cabinets, because it lets you transfer a mark from a floor point up to the wall, such as aligning a cabinet edge with a base cabinet below.
At 75 feet, the range is more than a kitchen requires. The key trade-off is that the compact housing offers a smaller footprint, which can be a strength in tight spaces and a weakness if you rely on the tool to sit steadily on an uneven surface. Use a mount or a flat, stable shelf. As with other lasers in this list, the listing does not include an accuracy figure, so run a check yourself before drilling.
Pros: compact; Class 2 stated; plumb spot; pro brand. Cons: premium tier; battery type not listed; accuracy not shown in the title.
4. Huepar Green Cross Line Laser: Best Value
- Self-leveling green cross line laser
- 100-foot stated range
- Indoor use for picture hanging, tile and decoration, per the listing
- Accuracy and battery type: not listed
Best for: homeowners hanging a single kitchen or garage set of cabinets on a budget. Skip if: you want a tool backed by a large trade brand.
The listing itself says the tool is meant for indoor use around picture hanging and tile, which are the same kinds of light-duty layout jobs you do when you set cabinets. A 100-foot stated range exceeds any kitchen run. The tool projects the cross lines you need to find your cabinet bottom line and keep every unit on the same plane.
The trade-off for a lower price is that fewer details are provided. You should check accuracy with the simple test described below, and you should confirm the mounting thread size if you want to use a tripod. If the line looks fuzzy at the end of a long wall, move the tool closer, because laser lines naturally widen with distance and a wider line makes it harder to mark a precise point.
Pros: budget tier; green beam; 100 ft stated range; suited to indoor DIY. Cons: accuracy not listed; fewer pro features and less brand support information.
5. Fanttik D2 Pocket: Best Pocket Size
- Pocket green laser level for picture hanging and home DIY, per the listing
- 100-foot self-leveling cross line
- Type-C rechargeable
- Accuracy: not listed
Best for: small installs, a single wall of cabinets, or tight pantry spaces. Skip if: you need a wide stable base or tripod threads.
A pocket-sized laser is easy to stash, and USB-C charging means you can refill it with a phone cable. For a cabinet job, the compact size is helpful on a narrow shelf or inside a cabinet box, where you might project a line along the inside edge. The downside is stability: a small base can rock on a rough surface. Prop it on a flat board or use a magnetic mount if the accessory list includes one.
It pairs well with a simple workflow: set the tool on the countertop at a known height, mark the line on the wall, then remove it and use a straightedge. Do not rely on a pocket tool for outdoor or very bright conditions. The listing positions it for picture hanging and home projects, which includes cabinet layout inside a house.
Pros: small; USB-C rechargeable; 100 ft stated range; budget tier. Cons: small base; accuracy not listed; mounting options unclear.
6. CIGMAN Green Cross Line Laser: Best Budget With Extras
- Self-leveling green cross line, 100-foot range
- Four brightness levels
- Magnetic bracket
- IP54 and pulse mode, per the listing
Best for: DIYers who want the most listed features for the least spend. Skip if: you want the confidence of a large tool brand.
Pulse mode is meant for use with a laser detector, which can help when a line is hard to see. Four brightness levels let you dim the beam in a small room, so a bright line does not bloom on glossy walls. The magnetic bracket is the feature that matters for cabinet work: if you have steel studs, a steel stud track or a metal ledger, you can stick the laser at the target height rather than balancing it.
IP54 indicates some protection against dust and splashing, which helps on a messy renovation site. It does not make the laser a rugged jobsite tool, so keep it away from drops. The listing does not give accuracy, so verify it before you trust it with a wall of cabinets.
Pros: low cost; magnetic bracket; four brightness levels; pulse mode; IP54. Cons: accuracy not listed; lesser-known brand; limited support information.
Also Consider
Motovera Self Leveling Laser Level With Tripod
This 100-foot green cross line comes with a tripod, four brightness modes and a pulse function. The tripod is useful if you want to set height without stacking boxes. It is a good alternative if you have no way to mount the tool on a wall.
Klein 93CPLG Compact Self-Leveling Laser
This is the longer-range sibling of the 93MCLPG. The listing describes a 100-foot rating, Class 2 with 1 mW or less, and a green cross line. It costs more, so choose it only if you need the extra range outside kitchens.
Huepar 3×360 Green Laser Level
The listing describes a rechargeable three-plane green laser. Three planes are overkill for hanging cabinets but can help if you also plan to lay tile or set a full room. It is a larger, more complex tool.
How We Chose
This guide is research-based. We did not personally use these products. We began with the green cross line lasers in the product store for this site, then narrowed the list by range, mounting features, power source and the details in each listing title. We compared brand information against manufacturer product pages and general guidance from the woodworking and remodeling press about laser levels and cabinet installation.
Where the listing did not state a spec, we wrote “not listed.” We capped each brand at two models, described price only as tiers, and avoided accuracy claims because most listings do not publish a figure. You should confirm specs with the maker before buying and use the accuracy check below on whichever laser you choose.
Buying Guide
Why green instead of red
Human eyes are more sensitive to green light than red, so a green line often looks brighter at the same power. For a kitchen with white walls and ceiling lights, that visibility is a practical advantage. Green lasers can use more battery power than red, so check runtime if you plan to work all day. Pulse mode, found on some models, lets a laser detector pick up the line in bright light.
Self-leveling and the lock
Self-leveling lasers use a small pendulum that settles to level when the tool is roughly upright. Look for a pendulum lock that holds the mechanism during transport, because a loose pendulum can be damaged. When the tool is outside its leveling range, most models flash or beep. Never ignore that warning, because the line is no longer level.
Range and line thickness
For cabinets, a stated range over 30 feet is plenty. Beyond that, a longer range matters only outdoors or on large jobs. Line thickness grows with distance, and a thick line is harder to mark accurately, so keep the laser as close as practical to the wall you are marking.
Mounting options
A laser that can sit on a countertop is useful, but a magnetic bracket, a wall clamp or a tripod thread gives you control of the height. If your model has a 1/4-inch thread, you can use a basic tripod. If not, a small adjustable stand is a low-cost addition.
A simple accuracy check
- Set the laser on a flat surface about 10 feet from a wall and mark the line at two points.
- Rotate the laser 180 degrees, and mark the new line.
- Measure the difference between the marks. A small difference suggests the tool is within tolerance; a large one means it needs service or return.
This is a basic home check, not a calibration. If the tool has a published accuracy figure, such as a number of millimetres per metre, compare your result to it.
Worked example: where the line goes
Many kitchens place the bottom of wall cabinets 18 inches above the countertop. If your counter surface sits at 36 inches from the floor, the bottom of the uppers lands at 54 inches. Measure up from the highest point on the floor along the wall, not from the floor directly below the cabinet, because floors are often not level. Set the laser so its horizontal line hits the 54-inch mark at both ends of the wall. The top of a 30-inch cabinet would then be at 84 inches. If the line is within about a sixteenth of an inch of both marks, you are ready to mark stud positions and screw a temporary support rail along the line.
Decision guide
| Your situation | Pick | Reason |
|---|---|---|
| One kitchen, tight budget | Huepar green cross line | 100 ft range at a budget tier |
| Regular remodeling work | DEWALT DW088CG | Pro brand, green lines |
| Want a trusted mid-range | Bosch GLL50-20G | Brand support, green beam |
| Small spaces, quick jobs | Fanttik D2 Pocket | Pocket size, USB-C |
| Steel studs or metal surfaces | CIGMAN green cross line | Magnetic bracket |
| Clear laser class rating | Klein 93MCLPG | Class 2, under 1 mW |
Step-by-Step Layout for a Run of Upper Cabinets
- Empty the wall and find the highest point of the floor along the run with the laser’s horizontal line and a tape measure. Starting there prevents the whole row from sitting low at one end.
- Measure up to the cabinet bottom height and mark it at one end. Level the laser so its line hits that mark, then mark the same line at the other end and in the middle.
- Snap or draw a light pencil line along the beam. Check it against a long spirit level if you have one, since a second reference catches a damaged laser.
- Locate the studs and mark their centres above and below the line, so you know where screws will go before the first cabinet is lifted.
- Fix a straight support rail with its top edge on the line, hang the corner cabinet first, and use the vertical beam to check that its side is plumb before driving the final screws.
- Work along the run, clamping each box to its neighbour, and confirm with the laser line after every second cabinet that nothing has drifted.
The reason for starting at the corner is that every later cabinet references it. A small plumb error at the start grows as you move down the wall, so spend the extra minute there. Follow the cabinet maker’s own instructions for fastener type and weight limits, because the wall structure, not the laser, decides how much a cabinet can carry.
Common Mistakes to Avoid
- Marking from the floor instead of the high point. A sloping floor creates a sloping cabinet row.
- Ignoring the out-of-level warning. A flashing line means the laser is not level.
- Working in direct sunlight. Even a green beam can fade, so dim the room.
- Skipping the support rail. A temporary rail along the line lets you rest each cabinet while you screw it in.
- Not checking stud locations. A level line does not tell you where to drive screws.
Frequently Asked Questions
Is a green laser better than red for cabinets?
Green is usually easier to see in a bright kitchen, so many installers prefer it. Red lasers can be fine in dim rooms and often cost less.
Do I need a tripod to hang cabinets?
No, but it helps. A tripod, a wall clamp or a magnetic bracket lets you set the exact height, while a countertop or box stack can shift.
What is a cross line laser?
It projects one horizontal and one vertical line at the same time. That gives you a level reference and a plumb reference without moving the tool.
Is a Class 2 laser safe for eyes?
Class 2 lasers are low power, but you should never stare into the beam or point it at people. Follow the instructions in the maker’s manual.
How accurate does the laser need to be?
For cabinets, a small error over a few feet is acceptable. Check your tool with the simple 180-degree test and compare the result to the maker’s published accuracy where available.
Can a laser find studs?
No. A laser shows a line. Use a stud finder or the cabinet layout drawing to locate studs, then use the laser line to keep your marks level.
How high should upper cabinets be?
A common setup is 54 inches from the floor to the bottom of the cabinet, which leaves 18 inches above a standard counter. Adjust for your own height, appliances and the maker’s installation guide.
Which One Should You Buy?
Choose the Bosch GLL50-20G for a balanced, trusted pick. Choose the Huepar or CIGMAN model when budget is the main concern, the Klein 93MCLPG if you value a clear Class 2 rating and a compact body, and the DEWALT DW088CG if you will use the tool often. The Fanttik D2 Pocket works for small jobs. Whatever you choose, run the accuracy check, find the high point on the floor, and use a support rail.
Sources
- Bosch Power Tools product page for the GLL50-20G
- DEWALT product page for the DW088CG
- Klein Tools product pages for the 93MCLPG and 93CPLG
- Huepar, Fanttik and CIGMAN product listings
- Cabinet manufacturer installation guides for wall cabinet height
Last updated: October 2026